


CAVI-T FAQ
Welcome to the CAVI-T FAQ.
Learn more about CAVI-T
Discover the Q&A
- The CAVI-T device offers several innovative features designed to improve the management of intranasal bleeding while maximizing patient comfort as well as ease of use for healthcare professionals:
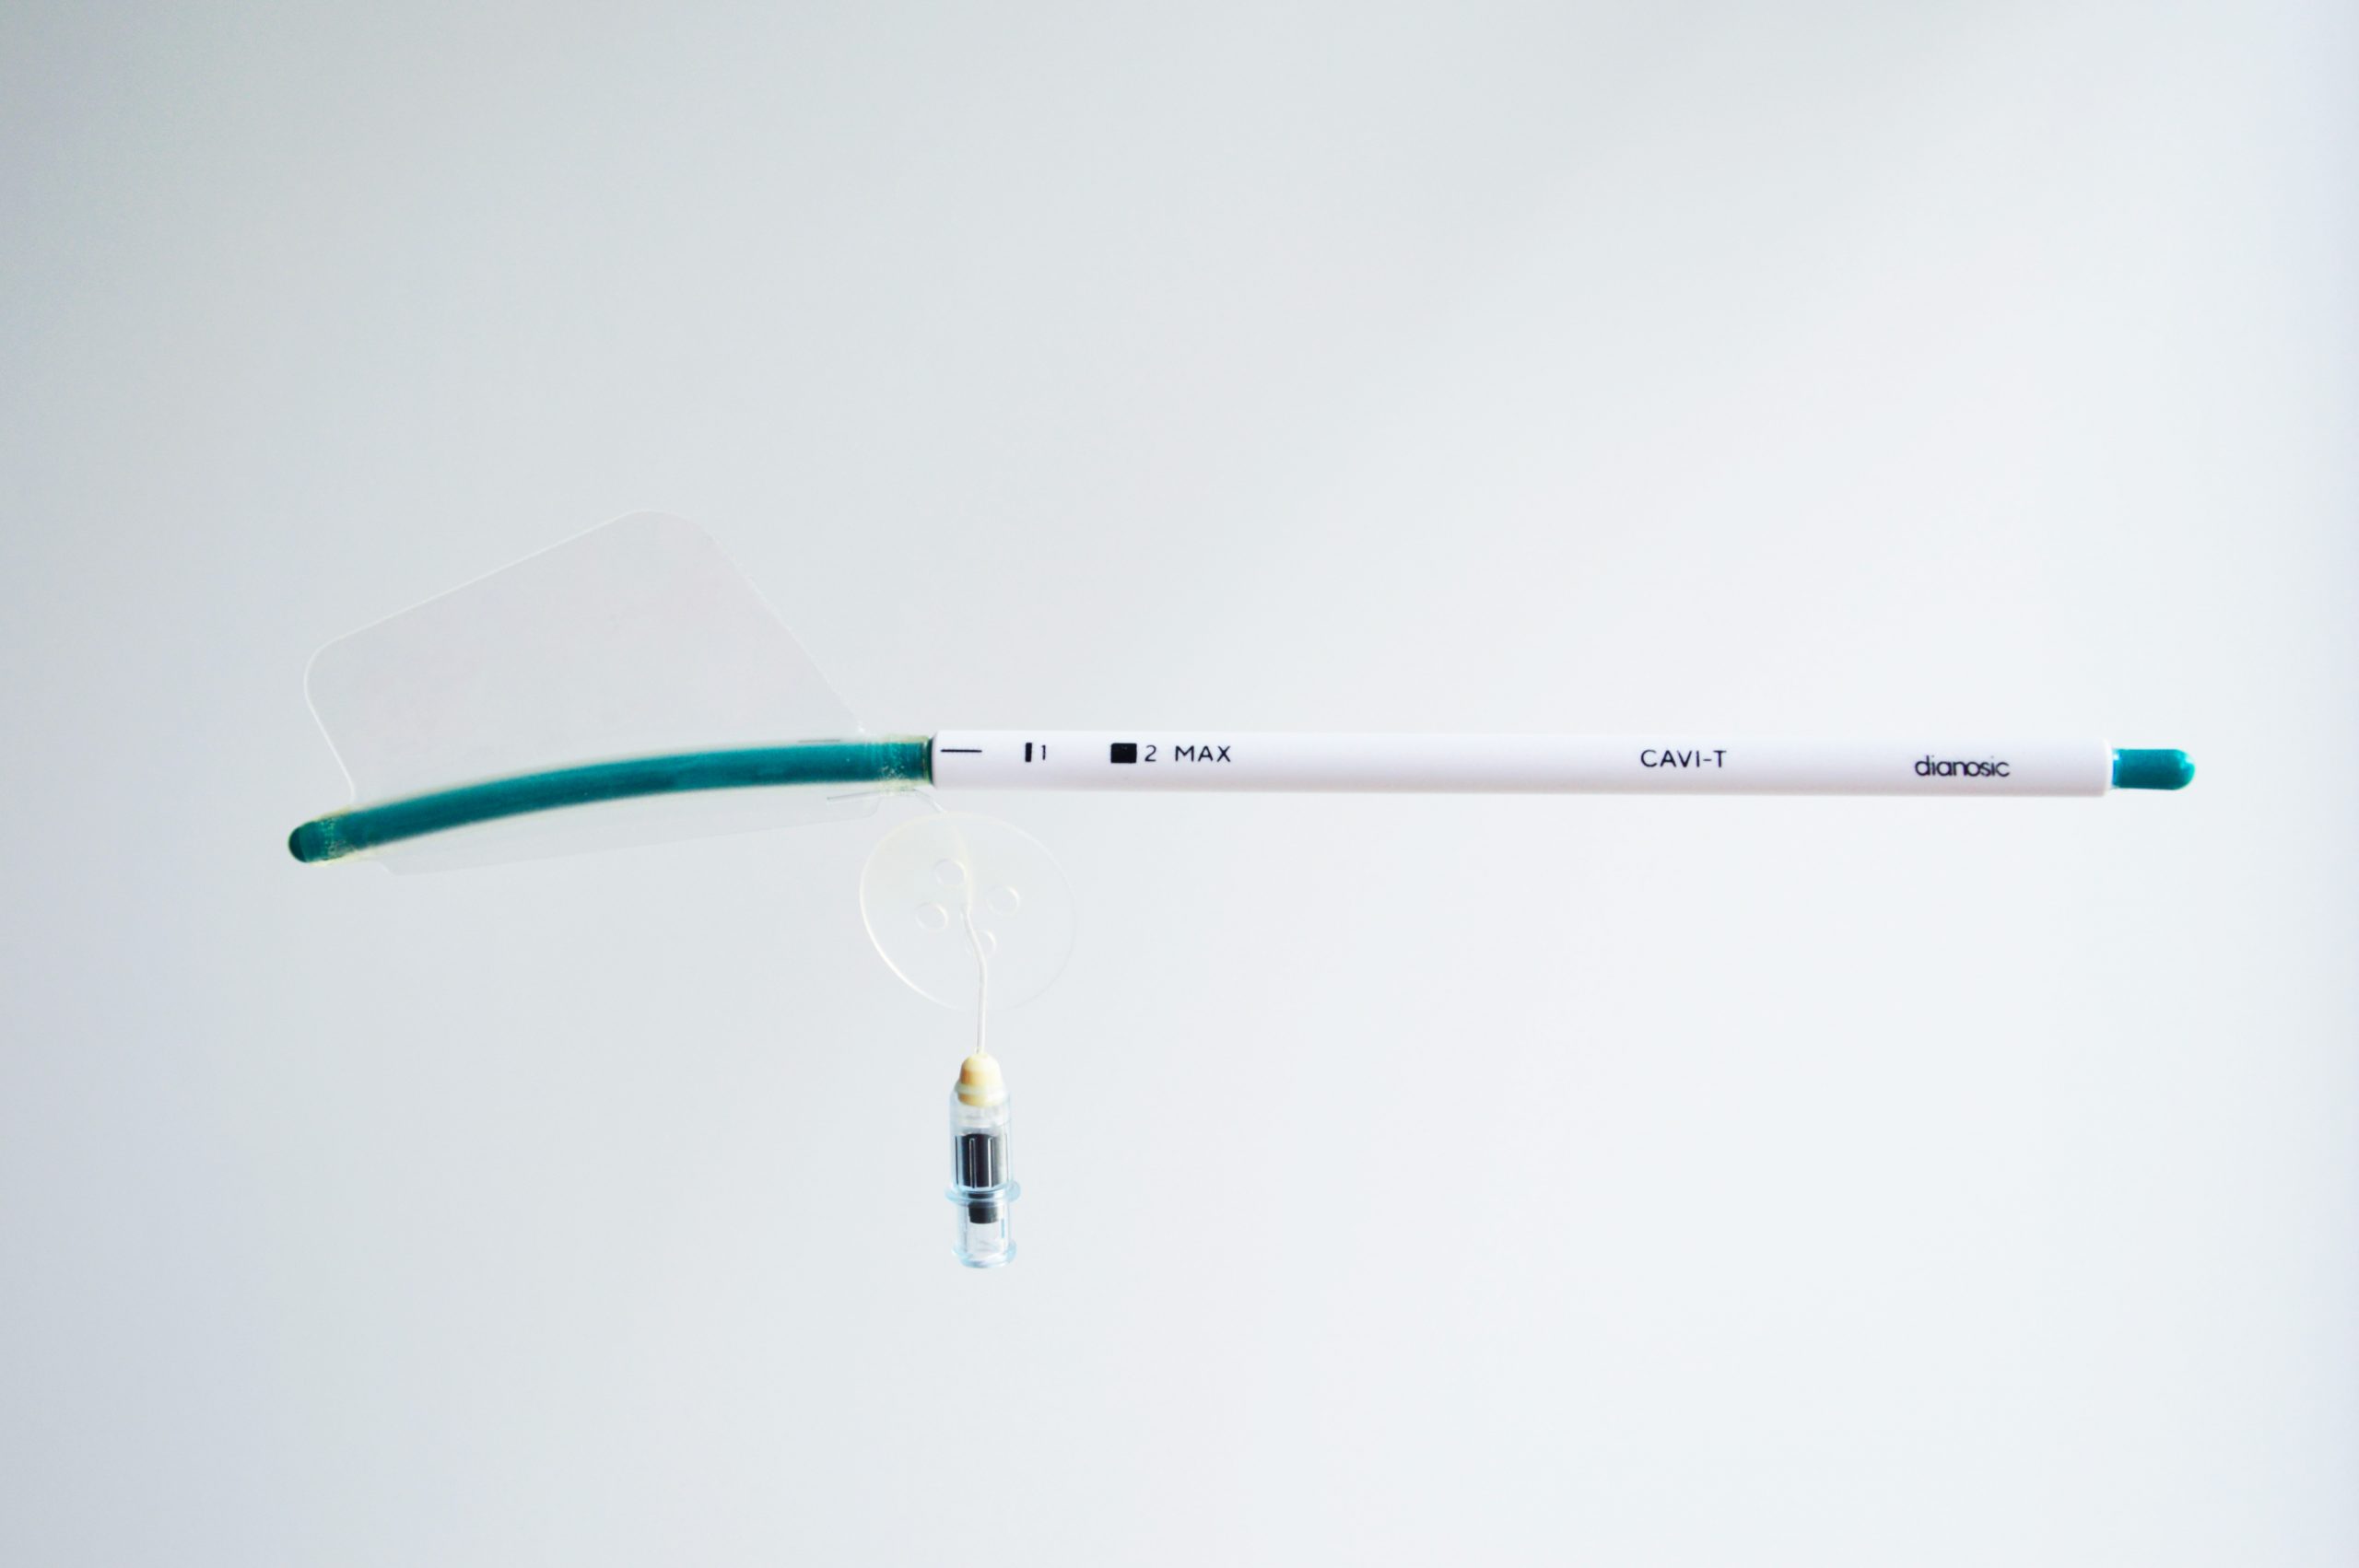
- Deployment guide: The rigid deployment guide ensures precise, controlled balloon insertion, while maintaining a safe distance between patient and healthcare professional.
- Polyurethane balloon: Designed to avoid the potential allergic reactions associated with latex, the polyurethane balloon features a unique asymmetric shape adapted to the diverse anatomy of patients, offering better compliance, and reducing the risk of displacement thanks to its horizontal cutout.
- 1" and "■2 MAX" markers: These markers help define the precise insertion axis and help position the device at the ideal depth, guaranteeing effective, targeted treatment.
- Traumatic distal tip: The tip of the device is specially designed to minimize trauma during insertion, contributing to a more comfortable patient experience.
- Luer Lock valve: Essential for balloon inflation and deflation, the Luer Lock valve enables precise regulation of balloon size. Thanks to its ability to withstand up to 2kg of traction, this valve guarantees safe use. It ensures precise balloon inflation, minimizing the risk of air leakage.
- Anti-migration disk: This key component prevents any undesirable posterior migration of the device in the nasal cavity, ensuring stability and consistent treatment performance.
- DBA01D: CAVI-T, asymmetric intranasal balloon, available in boxes of 10 units. Designed for standard application and suitable for users with all levels of experience.
- DBA02D: CAVI-T, asymmetric intranasal balloon, available in boxes of 10 units, with an optimized balloon shape for wider coverage, ideal for clinical situations requiring more precise positioning.
- DBA01DU: Unit version of DBA01D.
- DBA02DU: Unit version of DBA02D.
- The main difference between DBA01D and DBA02D lies in the design and coverage of the nasal cavity by the balloon:
- DBA01D: The shape of the balloon provides less extensive coverage of the nasal cavity. This version is particularly suitable for less experienced users or first-time users of the device, offering simplicity of insertion and positioning.
- DBA02D: The balloon shape is designed to cover a wider area of the nasal cavity, requiring more precise positioning. It is particularly recommended for patients who have undergone surgical procedures such as ethmoidectomy or turbinectomy, as it offers better coverage of the areas concerned, ensuring more effective management of bleeding in these specific cases.
- Although the hollow tube of the CAVI-T can potentially be blocked by secretions, this does not completely eliminate the patient's ability to breathe through the nose. Regular flushing with a saline-filled syringe helps to clear secretions and maintain the permeability of the tube. This feature is designed to improve patient comfort by allowing some nasal breathing, unlike traditional methods which force the patient to breathe only through the mouth.
- Preparing the CAVI-T device involves several key steps to ensure effective insertion and application:
- 1. Preparation and assembly: Dissociate the balloon from the guide and soak each component in saline to ensure ease of insertion. Then reassemble the balloon on its guide, taking care to align the markers on the deployment guide with the one on the balloon.
- 2. Axis adjustment: Align the 2 horizontal black markers to precisely define the insertion axis.
- 3. Prepare syringe: Prepare the Luer Lock syringe by withdrawing 20 to 25 cc of air, depending on syringe size, to prepare for balloon inflation. Only syringes with Luer lock connectors may be used.
- 4. Balloon pre-configuration: Using your fingers, preform the balloon film to form a slight wave on the side of the septum to facilitate balloon deployment once inserted into the nasal cavity.
- 5. Pre-inflation: It is advisable to pre-inflate the balloon slightly with 2 to 3 cc of air before insertion. This action helps to unfold the balloon and facilitate its positioning in the nasal cavity.
- Yes, we recommend pre-inflating the balloon with 2 to 3 cc of air before insertion. This pre-inflation facilitates the partial deployment of the balloon, making its introduction more fluid and precise, while facilitating its adjustment in the nasal cavity.
- Pre-inflation ensures that the balloon begins to take shape and adapt to the nasal anatomy as soon as insertion begins, reducing the risk of further manipulation or repositioning that could cause discomfort for the patient.
- Once all the preparation steps have been completed, the CAVI-T device is inserted into the nasal cavity in several stages to ensure precise positioning:
- 1. Insertion check: Insert the balloon into the nasal cavity, checking depth with the distance markers on the white part of the deployment guide, starting with positioning at marker 1 (to check for risk of displacement).
- 2. First-inflation: Connect the Luer Lock syringe, and pre-inflate (approx. 10 cc), holding the guide in place, as well as the tubing in its distal part, exerting a slight traction on it to avoid any posterior slippage. Then remove the deployment guide.
- We recommend to inflate the CAVI-T balloon with air as it has been developed to ensure optimal apposition to various nasal anatomies with its low pressure asymmetric design. You can also use water if for example you want to generate higher pressure during inflation. When inflating with water, we recommend the use of PPI (Preparation For Injection) water.
- To ensure correct positioning of the CAVI-T balloon, several key techniques need to be applied after the various preparatory insertion steps:
- 1. Check alignment markers: It is crucial to exploit the alignment markers present on the device to regulate the depth of introduction of the balloon into the nasal cavity. This helps to position the balloon so that it exerts uniform compression on the bleeding area.
- 2. Positioning adjustment: If readjustment is required, the balloon position can be finely adjusted by gently re-inserting the green proximal part of the deployment guide into the proximal part of the hollow tube. During this operation, it is important to hold the tubing firmly to prevent any subsequent displacement of the balloon.
- 3. Final inflation: Once the guide has been removed, balloon inflation should be continued until the desired volume is reached, taking care not to exceed 25 cc. During this phase, particular attention must be paid to patient comfort. Inflation must be carried out in such a way as to maintain a suitable pressure, without creating excess pressure which could cause discomfort for the patient.
- 4. Checking and securing the balloon: Unscrew the syringe and check the stability of the balloon by successive traction and pressure. The balloon should remain in place. Next, glue the tubing and valve to the patient's cheek, as close as possible to the nostril, but without over-tensioning.
- For more information, please see our CAVI-T YouTube videos.
- Once the CAVI-T balloon has been positioned, its stability can be checked by exerting a series of successive pulls and presses on the device. If the balloon remains in place without moving easily, this indicates good stability.
- Adjustments may be necessary if the balloon moves, by gently reinserting the green proximal part of the deployment guide into the hollow tube, while holding the tubing firmly to control any posterior movement.
- To treat anterior bleeding resulting from epistaxis, it is essential to position the CAVI-T correctly to deliver targeted compression to the bleeding area. Using the distance markers on the deployment guide helps determine the appropriate insertion depth. The "│1" and "■2 MAX" markers are located 1 and 2 cm respectively from the wing of the nasal cavity. The first marker, "│1", is specifically designed to help control anterior bleeding. This configuration helps healthcare professionals to accurately determine the insertion depth, ensuring that the balloon is positioned to apply appropriate compression to the area of concern.
- To effectively treat posterior bleeding, balloon positioning must take into account the need to compress bleeding areas further back in the nasal cavity. Positioning for posterior bleeding may require deeper insertion. The markings on the device, identified as markers "│1" and "■2 MAX", are decisive in assessing the appropriate insertion depth. In particular, the "■2 MAX" marker, located 2 cm from the nasal wing, is essential for the treatment of posterior bleeding. It is vital not to exceed this "■2 MAX" marker during insertion, to avoid any risk associated with excessive balloon positioning. When treating posterior bleeding, it is imperative to insert the CAVI-T precisely, using tactile sensations and distance markers as guides. This ensures that the balloon is positioned to exert adequate pressure on the source of bleeding, without causing over-inflation or discomfort due to incorrect positioning.
- At the end of the procedure, the anti-migration disk should be positioned to firmly secure the device and prevent any undesirable posterior movement of the balloon in the nasal cavity. The safety disk should be positioned in front of the nasal wing, taking care to avoid any over-tensioning. This precise positioning of the anti-migration disk is essential to enhance CAVI-T performance and minimize the risk of displacement or loss of compression that could compromise bleeding control.
- The length of time CAVI-T should remain in place depends on the healthcare professional's clinical assessment, the success of bleeding control and patient comfort. The device must remain in place long enough to ensure adequate bleeding control and stabilization of the bleeding area. However, it is crucial to note that the balloon should not remain in the nasal cavity for more than 72 hours. It can be removed earlier if bleeding control allows.
- To facilitate removal of the CAVI-T device, please follow a structured, multi-step procedure:
- 1. Complete deflation: Connect the Luer Lock syringe to the device valve and deflate the balloon completely.
- 2. Balloon removal: Use a surgical forceps to pull on the hollow tube, then carefully extract the balloon.
- 3. Post-removal monitoring: After removal of the CAVI-T, it is crucial to monitor the treated area for any renewed bleeding.
- CAVI-T is specifically designed to reduce pain and discomfort, both during insertion and removal, which sets it apart from other treatment solutions.
- A study and clinical feedback highlight this notable difference: on insertion, CAVI-T registers a pain rating of between 2 and 4 on the visual analog scale (VAS), whereas other devices such as Merocel or double balloon catheters can induce pain estimated at between 8 and 10. What's more, removal of the CAVI-T is accompanied by minimal pain sensation, evaluated on average at just 1.2 on the VAS, compared with an average of 7/10 for traditional alternatives.
- Thanks to its asymmetrical, low-pressure balloon and atraumatic tip, CAVI-T offers a significantly less painful experience than traditional methods such as nasal swabs or double-balloon probes.
- CAVI-T is suitable for a variety of clinical situations, such as:
- Spontaneous epistaxis: CAVI-T can be used to rapidly control spontaneous intranasal bleeding, offering a less invasive and more comfortable alternative to traditional methods.
- Post-operative surgery: Following procedures such as septoplasty or turbinectomy, CAVI-T can help manage post-operative bleeding and support the nasal structure during the healing phase.
- Support of nasal structure during reconstruction surgery: For patients who have suffered nasal trauma or have anatomical abnormalities, CAVI-T can provide temporary support, facilitating the healing process.
- Particular attention should be paid to patients with specific characteristics, such as an enlarged nasal cavity following surgical procedures such as ethmoidectomy or turbinectomy, marked deviation of the nasal septum, significant anatomical abnormalities, as well as to patients who are particularly restless. A tailored approach to these situations is essential to optimize the efficacy of CAVI-T, while ensuring patient comfort and safety.
Submit a CAVI-T Question
ASK QUESTION
CAVI-T AI
If you have any questions or would like to find out more about our CAVI-T device, click to the bottom below to access to the CAVI-T AI.